


Hey there, lovely reader!
Can you believe it? October has packed its bags and vanished faster than a bowl of ice cream on a hot summer day! But fear not, because with the falling leaves and cozy vibes, it's time to spill the beans on how I whip up those mouthwatering recipes that make your taste buds dance and your tummy do a happy jig.
In this month's blog post, I'm going to share the equipment I rely on. We'll talk cameras, lenses, lighting, and backdrops – all the tools that help me bring my recipes to life. If you've ever wondered about the nuts and bolts behind those delicious dishes, this blog post is tailor-made for you 🙂

📆 In This Update
Join my on my Instagram Channel
Before I get right into it, I want to invite you to join my new Broadcast Channel on Instagram! This is where I share even more behind-the-scenes footage of my video creations and you’ll get to see the magic happening in real-time 😊
My Food Photography Equipment


Before we get into it, just a quick reminder that as an Amazon affiliate, I may earn a small commission from qualifying purchases. But let me be clear, I'm not in this for the money. My goal is to offer you a helpful resource to learn about the equipment I use. If you've got your eye on a specific item, consider adding it to your "save-for-later" list. Keep an eye out for any Black Friday deals coming up – it's a prime opportunity to grab some great bargains!
On that note, here's a valuable tip for you: When shopping around Black Friday, be cautious of "deals" that may not be as good as they seem. I personally use a Chrome extension called "Keepa" to track prices on Amazon. It provides a simple graph that shows how item prices have changed over the past three months. It's a brilliant tool to avoid falling for misleading deals. So, stay savvy and make sure you're getting the best bang for your buck!
Camera
For the past 4 years I've been photographing and filming with my trusty Canon EOS R. I've ping-ponged between Canon and Nikon throughout the years but have stuck with Canon for the past couple. Mostly because I find that using them feels most natural to me - but I would say both Canon and Nikon are fantastic brands to choose for a camera. It's all down to personal preference however.
Alongside the Canon EOS R I use a lens adapter to connect all of my Canon EF lenses that I've collected throughout the years. I still have my eyes on getting an actual Canon R-range lens, so that an adapter won't be necessary - they surely have the best quality but also come with quite the price tag.
My Canon EOS R is not the camera I initially started with - and if you're only just starting out, I'd not recommend getting a pricey camera but instead learn to get the best out of the camera you already have (aka your phone). Start small and learn how to take what you have to the maximum it can do before upgrading - buying a pricey camera that you have no idea how to use can be incredibly irritating and frustrating and probably won't get you the results you're after.
I've worked with 4 different cameras as my 'full time' camera since I started with photography in 2009 (gosh, has it really been this long already?!) and the camera I was most amazed by was the Canon EOS M3. As far as I know, it's not sold anymore but this nifty £400 camera was simply amazing value for money and for my first 2 years of working as a full-time food photographer, this was the only camera I used (!). There's surely some newer versions of the model out there, so if you're looking for a camera to start with, have a look at Canon EOS M range 😉

Lenses
There are two lenses that I use pretty much 99% of the time: the Canon EF 50mm 1.8 - often also called the 'nifty fifty' - and a Canon EF 100m 2.8 Macro.
I mainly use the 50mm lens for flat lays, top-down and wider shots that show more of the dish and what's around it and the 100mm lens for those really close up crisp shots.
For food photography I've never needed anything more wide-angled and the 50mm lens does a great job for table flat lays and Co on the full-frame Canon EOS R camera. If you're using a cropped sensor instead of a full-frame camera, however, expect the image you get to be seemingly more 'zoomed in'. Using a cropped sensor basically just means that your camera only gets to see a part of the image that comes in through the lens, and the only way to see it all, is using a full-frame camera. On a cropped sensor camera, I'd opt for something like a 35mm lens for the same angles.
Lighting
Lighting is one of the most important aspects of getting crisp images and clips, but decent lighting doesn't have to be expensive.
I originally started out with just using natural light for my photos years ago but very quickly realised how limiting that can be. Being at the mercy of the whether and only being able to work for a few hours a day during winter times really wasn't the best, so I very quickly switched to using artificial light and haven't looked back since.

One main important thing to using artificial light is that you need to work in a dark corner. It might sound counter-intuitive at first, but you want to avoid natural light and artificial light mixing in your setups. It can otherwise cause your colour temperature and shadows to cause havoc and your images might just look 'off'. I use some cheap blackout blinds from Ikea to dark the windows closest to my setup and on a sunny day, I would also draw a curtain to prevent too much light coming in from the other side of the room.
My first two lighting kits were relatively cheap sets I brought through Amazon. They actually did a decent job - my first one had actual light bulbs that got very hot and used a lot of electricity, and the second one was LED with changeable colour temperature (which sounds fab but actually did my head in a lot of the time). It's probably worth noting that these came in a set of 2 each, but I only ever use 1 light at a time to this day, so there's definitely no need to get a big set of multiple lights.
The reason I finally upgraded was mainly because I needed a stronger light to film and photograph full table setups. I couldn't really do that with the smaller lighting kits but apart from that (and the flimsy tripods they tend to come with) they were fantastic value for money.
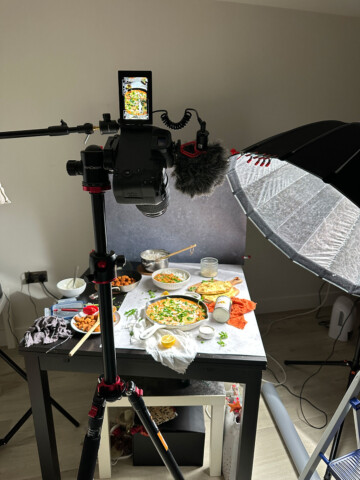
The light I currently use is an Aputure Amaran 100d and I mainly use it with a large octagon for diffusion and a honeycomb add on to make the light more directional and give me some nice shadows.
Another option for lighting photos is using flash. I personally never shot with flash for my food photography but it's something I want to explore at some point!
Backdrops
There are many great options for backdrops to use but I mainly use vinyls as they are easy to swap and easy to store as they don't take up so much space. Oh, and of course they are also much cheaper!
One downside to using vinyls is that depending on the angle of the light, it can slightly reflect on the surface of the vinyl and make it obvious that it's a vinyl and not e.g. a wooden tabletop. It take a bit of playing around with the light position and sometimes compromising with some editing.
I've collected numerous vinyl backdrops from Capture by Lucy and Club Backdrops and I can definitely recommend both! They have simply beautiful textures and colours to choose from, so you'll surely find something there.
A little extra tip from my side: start with only 1-2 backdrops with a colour and texture that is versatile and that you can use for a LOT of different setups. I've got a white stone and a dark wood one that are my ultimate basics for me - and if you closely look at my recipe videos and photos you might spot them throughout most of my content 😉
Useful Bits & Bops
There are many more items of equipment that I use, so I'm going to try and sum them all up for you briefly here.
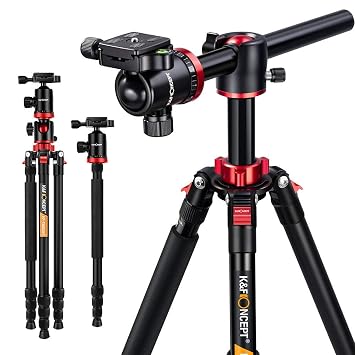
Tripods - I love my K&F overhead tripod so much that I already bought it twice. Okay, twice because one of the main screws broke on my first one making it impossible to put it into the top down position - but I still have it as a back up 😉 It's a fantastic tripod for the money, not overly heavy but heavy enough to not fall over with the camera and lens attached.
In addition to this one, I've also had a large Manfrotto boom stand for the past 9 years that's originally intended to be a light stand. I mainly use it as an overhead camera stand though and I've attached a camera tripod adapter to the end of it, so it can safely hold my camera. Worth noting that this one takes quite a bit of space when set up.
Light Stand - I use this heavy duty light stand from K&F for my Aputure light. It's not a boom stand but I've always been able to get all the angles I'm after with it.
LaCie harddrive - I've been through some ups and downs with hard drives throughout the years and have found that LaCie creates the most durable hard drives for storing moving large files. I use a rugged one that's great for moving around with a laptop as it's not so sensitive to getting knocked or dropped (which can happen!).
Laptop Stand - I sometimes love tethering my camera to my laptop and for that keep my laptop on this stand next to my set. It's a great quality laptop stand and I actually also used it as a standing desk for a while.
Backdrop Stand - I'm only renting so I can't plaster my walls with backdrops stands and blue tac. Instead, I use this simple poster stand to hold a piece of plywood to which I attach my vinyl backdrops with either blue tac or little clamps. Has always worked well!
Foldable Laptop Stand - Had this bamboo one for years and it's a great way to get a perfect angle onto the laptop without ruining your neck!
Arkon Phone Stand - For when I film with my phone, I love to use this Arkon Phone Stand! It's simply brilliant as it's easy to use and to change phone position - and it gives you all the great angles you might need.
Soft Floor Mats - This last one is less helpful for the photography part of the job but amazing to use if you stand a lot for your work. I've got these on my kitchen floor in the areas I spend most time in (aka the stove and the sink area) and they've been a great saver for my ankles and joints that used to hurt so much after a long day of work. I've also been wearing running shoes for work for a few years now and that has definitely helped as well!
That's a wrap for this month's behind the lens update. I hope you've found this insight useful & don't forget to join me on my Instagram channel for more looks behind the scenes 🙂
Catch you next month! 💌

💭 Leave a Comment